
The Switch
Published: 2023/3/30

Welcome to the inaugural post on my blog! In this article I will share my experience moving my personal website from Next.js 12.0.4 to SvelteKit 1.0.0. This will include some differences and similarities between the two frameworks, discussing all the technologies I'm using in my stack, and the making of this blog itself.
Why the Switch?
I've been reading and hearing the buzz around Svelte for a couple years now. There are countless articles and videos about how simple and refreshing it is compared to other more mainstream frameworks, with React being the biggest target for comparison. I am not here to bash React though, I work with it every day at my job and I still love it! I wouldn't have used it along with Next.js in the last iteration of my website if I didn't. But the allure of new technology is very real, and maybe the grass really is greener on the other side. You won't know if you never try it, so I took the plunge to see what Svelte and its meta framework SvelteKit had to offer.
Project Structure
I want to start with the two technologies I kept the same between projects, which are Tailwindcss and TypeScript. Not everyone is a fan of either, but I find that both speed up my development and productivity.
Tailwind's utility class approach lets me do 95% of my styling in the HTML itself, and I can still write my own CSS for that last 5%. I also appreciate the purging it does at build time to reduce the CSS bundle size to only what you use.
TypeScript helps catch syntax and object property access errors in development before they become headaches in production. As we'll see later on, TypeScript also integrates really well in the rest of my SvelteKit stack with end to end type safety.
Now let's take a look at how my Next.js project structure differs from what I ended up with in SvelteKit.
Next.js 12
/components
    components...
/pages
    /api
    _app.tsx
    _document.tsx
    index.tsx
    protfolio.tsx
    resume.tsx
/public
    /data
        resume.json
    /fonts
        fonts...
    /images
        images...
/styles
    css...
/types
    types...
You can view the full source code here, but this is decently minimal considering how simple the site is. Note the .json file under /public/data. I used this to house all the information for the resume page since I felt like a database would be overkill for the project. Now let's take a look at my final (as of the making of this article) SvelteKit project structure:
SvelteKit
/src
    /lib
        /components
        /stores
        /styles
        /types
        /utils
    /routes
        /api
            /viewCount
        /blog
            /[slug]
        /edit
            /[slug]
        /login
        /portfolio
        /resume
        +page.svelte
        +layout.server.ts
        +layout.svelte
        +error.svelte
    app.css
    app.html
    etc...
/static
    /images
/tests
The source code for the project lives here if you want to get the full picture. There's a lot more going on here with this project, and that's mostly due to adding the blog, but also because I chose to use Supabase as my back end instead of a .json file. I'll get into that more later.
Next I want to show how components differ between React and Svelte.
Components
Since Next.js is a React meta framework, JSX (or TSX in the case of TypeScript) is used to describe the UI. Here's an example component:
import React from 'react';

interface componentProps {
    paragraphs: string[],
    url: string
}

const Component: React.FC<componentProps> = (props) => {
    // note you could also spread the props to be { paragraphs, url }
    // add css-in-js, css modules, inline styles, etc

    const updatePunctuation = (str: string, oldPunc: string, newPunc: string) => {
        return str.replaceAll(oldPunc, newPunc);
    }

    return (
        <article>
            {props.paragraphs.map((paragraph, i) => {
                return <p key={i}>{updatePunctuation(paragraph, '.', '!')}</p>
            })}
           <a href={props.url}>Go Somewhere</a>
        </article>
    )
}

export default Component;
And here's the port of that component to Svelte:
<script lang="ts">
    export let paragraphs: string[];
    export let url: string;

    const updatePunctuation = (str: string, oldPunc: string, newPunc: string) => {
        return str.replaceAll(oldPunc, newPunc);
    }
</script>

<article>
    {#each paragraphs as paragraph, i}
        <p>{updatePunctuation(paragraph, '.', '!')}</p>
    {/each}
    <a href={url}>Go Somewhere</a>
</article>

<style>
/*scoped styles here*/
</style>
Admittedly this is a simple example, but you can see the different patterns in each example. JSX is more JavaScript oriented, requiring exports and a wrapper function around the markup. Svelte uses SFCs or Single File Components to house everything or almost everything needed for a component. Svelte components also take a more HTML centric approach, using custom directives within and around HTML to apply JavaScript/TypeScript as needed. How your components accept props is also different in Svelte, since variables which are props are instantiated with export let as opposed to the more direct props parameter in JSX. Using components is more or less the same however. Here's an example for both components above:
const arrayOfStrings = ["hello.", "world."];
const url = "www.ianpriceweb.dev";

// React
<Component paragraphs={arrayOfStrings} url={url} />

// Svelte
<Component paragraphs={arrayOfStrings} url={url} />
Besides the logic and markup, styling also differs between the two frameworks. Next.js highlights the use of CSS modules for styling, but there are also CSS-in-JS libraries, or regular global CSS. Styles in Svelte on the other hand are either global, or scoped. Scoped styles mean that Svelte will generate a unique class name for each component, so each component's styles won't bleed out to other components on your pages. Styles are also automatically purged from your components if they're not used directly in the markup, which proactively prevents zombie styles from bloating your CSS bundle.
Now that we've covered components, let's discuss pages and layouts.
Pages and Layouts
Pages in Next.js and SvelteKit are quite different overall. In my experience, Next.js has a lot of copy/pasting of layout/structural components from page to page. I found that I had to make a small check list for new pages, making sure I copied over my header, footer, and relevant React Context API wrappers. It's not that big of a deal for pages that are small in scope like mine are, but if you have a lot of structural components that don't change their position in the DOM from page to page I could see it being quite a chore.
Svelte has a handy way around this with a special file called +layout.svelte. In this file you can drop in all your structural page components in one place, and SvelteKit will apply this layout to every page on your site. This is all the markup I needed for my layout:
<div class="min-h-screen flex flex-col">
    <Header />
    <main class="flex-grow px-4 pb-10 md:px-8 lg:px-16 xl:px-32 2xl:px-64">
        <slot />
    </main>
    <Footer />
</div>
The <slot /> component provided by SvelteKit will inherit the markup and components from our pages and wrap it in the surrounding layout. This makes it really easy to have a cohesive structure to all your pages. If you do need to change this layout on a different page, there is a work around but in my opinion it's very messy. You can read about it here.
One similarity they do share however, is that both have custom elements to set meta data in the document's head. Next.js uses a component called <Head /> and SvelteKit uses <svelte:head />. Another similarity is custom 404 and 500 error pages, where you can display custom messages to users about things that have gone wrong in their journey. There are probably more similarities than that, but as far as I've found that's really it.
Now that we have our pages, we need a way to route between them.
Routing
From the two project structures above, this is one of the biggest differences between the two frameworks. In Next.js there is a pages folder where you drop in your full pages of laid out components, and then link to them with the Next.js <Link /> component. This includes error pages, such as 404 and 500. SvelteKit on the other hand uses file system routing, where each of your pages lives in their own directory/subdirectory of the routes folder, and you can link to them with normal anchor tags.
Routing differences also lead to how pages are named. The Next.js <Link /> component will search for the .jsx/.tsx file that matches the href prop you provide. So <Link href="/" /> will go to index.tsx, /resume will go to resume.tsx, etc. Since SvelteKit is using folders for routing, you use a regular anchor tag to move between pages. What can be a bit jarring at first though, is that every page in a SvelteKit project is named +page.svelte. A link to the the resume page looks like this for example: <a href="/resume" /> but it maps to /resume/+page.svelte. This can get confusing if you have multiple +page.svelte files open in your editor, since the same file name appears multiple times. However if your editor shows the file path to your current open file it's not that big of a deal. Each route can also have a +error.svelte file to render out custom errors per route as needed.
So we can get to our pages now. But say a page has dynamic content to load, how do you get it? The two frameworks fetch data for each page in their own way.
Data Fetching
Next.js has special functions for server side data fetching. These include getStaticProps which obtains data only at build time, and getServerSideProps for data that's fetched on each page load. These functions are used in each page .jsx file to generate props which are then given to your overall page component within that file. From there the data can be passed around as needed. Here's an example of how I was loading my json file on the resume page:
import data from '../public/data/resume.json';

export const getStaticProps: GetStaticProps = async (context) => {
    // if the data isn't found, return a 404
    if(!data) {
        return {
            notFound: true
        }
    }
    return {
        props: {
            data
        }
    }
}

const Resume: NextPage<ResumeData> = (resumeData: ResumeData) => {
    // resumeData.data now houses all the json loaded by getStaticProps
}
SvelteKit takes a slightly different approach for server side data fetching, In SvelteKit, each page has dedicated front end (+page.svelte) and back end (+page.server.ts or .js) files. There's also +page.ts (or .js) files which can run on both the client and the server, but I won't cover that here since I didn't use them. Each +page.svelte can declare an export let data variable, which a sibling +page.server.ts file will populate from a function called load. This load function should house all the logic required to get the data your page needs, and return it as a plain object. Here's a simplified view of how my resume page loads data:
// +page.server.ts
export const load = ( async () => {
    const educationData = await getAllEducationData();
    const skillsData = await getAllSkillsData();
    const jobData = await getAllJobData();
    return { jobData, educationData, skillsData }
});

// +page.svelte
<script lang="ts">
    import type { CombinedResumePageData } from "$lib/types/resumeTypes.types";
    export let data: CombinedResumePageData;
    const { jobData, educationData, skillsData } = data;
    // individual data objects are spread around from here
</script>
Individual functions ping Supabase to query for relevant data. Then once the data is returned they are combined into a single object for the front end to destructure and use.
Having dedicated server files also works for the +layout.svelte file I mentioned earlier. If you have server logic you need to run on every page load regardless of the page, you can make a sibling +layout.server.ts file and do that logic there.
Not every page needs to load data however. In SvelteKit if you have a page which is only static content, you can omit a sibling +page.server.ts file and just do everything you need in +page.svelte. Likewise in Next.js you can leave out implementing a data fetching function to just serve a static page.
Lastly, for pages which need client side data fetching, Next.js recommends their own SWR library. It should be noted that while SWR is recommended you don't have to use it. The Fetch API, Axios, or whatever your personal favorite library is for client side data fetching can be used as you see fit. This is true for Svelte as well.
Final Thoughts on Comparing the Two
I hope this has highlighted some of the larger differences between Next.js 12 and SvelteKit. I liked using Next.js last time around and I still like it today. However, I've had such a nice time using SvelteKit, and I can see why it and Svelte on its own are getting so much praise from others! I see them as another set of tools in my arsenal, and I'll definitely be keeping up with both frameworks as time goes on.
I would also like to acknowledge that Next.js has had another major release since I wrote my last site. Some features are still in beta, but one which addresses part of my criticism is their own version of layouts, which is awesome! You can read the release on their blog here.
Next let's move on to some new features that I've built into this website.
What Started as a Port Became so Much More
At first this project was only going to be a port of my portfolio site. I wanted to learn Svelte (and SvelteKit), and an easy way to come to grips with a new framework is to use a previous project as a template. This lets you keep all the logic that's reusable, and focus on learning the actual framework itself. However, Svelte had surprised me a lot. I was really enjoying my time with it, and as I was nearing completion on the port I realized that I wanted to keep going. I wanted to add some new feature, a side project within the project if you will. I also wanted to share my experience using Svelte, and so this blog (or at least the idea for it) was born!
It turns out that Tailwindcss has a typography plugin for blogs, which gave me a nice baseline of styles to work with (though I did end up customizing some things). The only problem is I had no idea how I wanted to actually build the blog. My initial checklist of things I would need to figure out included:
- How will articles be loaded and stored?
- How will article meta data be handled?
- How will articles be written and edited?
My initial research brought me to this excellent article by Josh Collinsworth. In it he shows how one can leverage a library called MDsveX to pre render markdown files into HTML. MDsveX also includes the ability to store metadata as frontmatter within the markdown file itself, as well as import Svelte components to be rendered in the articles. That last point is very neat if you want to have interactive components in your articles. He goes over two methods of routing to blog posts:
- Use the normal file system routing SvelteKit has out of the box
- Build a dynamic route using a [slug] subdirectory and fetch the blog post out of a single folder based on the slug parameter.
He recommended option two, and initially that's what I went with as well. Things seemed to be going well, and my initial checklist was satisfied. I ran into a snag however.
I remembered how this site was going to be deployed on Netlify like my last site, which in my configuration only redeploys whenever I update the Github repo for the site. This meant that in order to get a new blog post on to the site I would have to deploy a new version of the whole application via merging into the main branch in Github. And not just for new posts, if I wanted to publish an edit to a post, or maybe take it down because I accidentally deployed it before it was ready, I would have to do another deployment to my main branch. This also meant that if I wanted to view how the article looked on the site as I was editing it, I would need to always have my development environment available (with a new branch). It just didn't seem ideal for what I wanted to build.
So then I thought "why not use a database or storage bucket to store my articles instead?". In comes Supabase! I've been looking for an excuse to use Supabase as the backend to a side project for a while, and it seemed more than up to the task. It gave me access to a Postgres database in the cloud, a storage bucket to drop files into, and an easy to use API with documentation to wire everything up. Another important tool from Supabase I took advantage of was their type generation script. By running the following command, Supabase would analyze my tables and generate a file full of types that I could use to ensure type safety on both the front end and the back end:
npx supabase gen types typescript --linked > src/lib/types/database.types.ts
The database freed me from using a json file to store my resume data. I could now just add, update, or delete rows in their table editor web app, and my SvelteKit code would reflect any changes on the next refresh. If I wanted to I could also set up subscription based updates so a refresh wouldn't be required to get new data to the page, however I didn't need that feature in this case.
Their storage bucket would let me store my articles as well as images for those articles in the cloud, so I wouldn't have to deploy the whole application just to get a new blog post up on the site. I could use the same API logic from Josh Collinsworth's article and just fetch the files from the bucket instead of importing them from a local folder. Or, at least I thought I could....
I immediately ran into issues trying to get MDsveX to compile the markdown files after retrieving them from my storage bucket. The issue was with trying to import Svelte components in the markdown file. During compilation MDsveX would throw a "module not found" error even if I gave the markdown file an exact path to the component. I even went as far as importing the preprocessing and compilation functions directly from MDsveX and fed it the raw text from the markdown file, but this didn't work either. Everything but importing Svelte components was working fine however, so I decided to just stick with what I had for now.
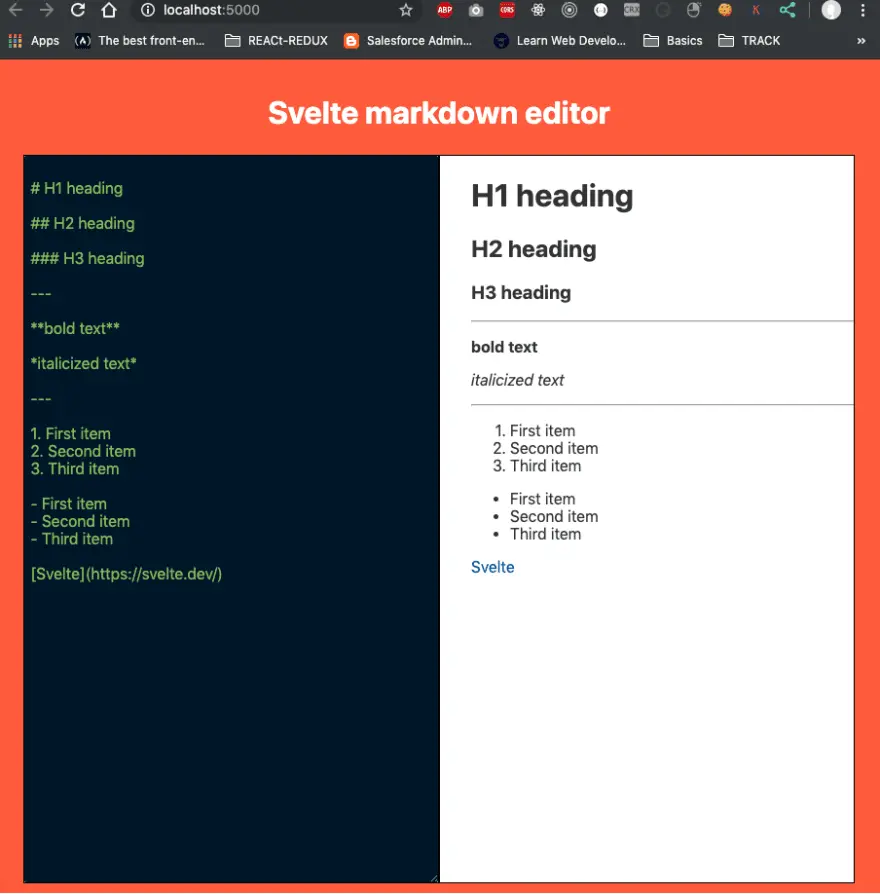
Another problem I was still having was the actual writing of the blog posts. I mentioned earlier how I didn't have a way to preview my articles as I was writing them without having my entire dev setup running. I still didn't have a solution for that at this point. I've changed my upload process from Github branch deployments to manually replacing the markdown file in a storage bucket every time I wanted to preview some updates, which is slow and tedious. It was at this point that I found this article by Nikhil Karkra. It's a neat little tutorial where he shows how to use the bind:value directive in Svelte as well as the Marked.js library to have a side by side pair of windows, where the textarea on one side accepts markdown, and the other side displays the compiled HTML in real time. If you use the same styles your actual blog posts are going to use, this essentially gives you a "what you see is what you get" live editor in the browser.
 |
|---|
| The side by side markdown editor from Nikhil Karkra's article |
A lightbulb immediately went off in my head. Based on Nikhil's example, Marked.js is taking the entirety of the markdown text in the textarea and converting it to HTML on the fly. Instead of storing the blog posts as files in the Supabase storage bucket, why not just store the raw markdown in a table in Supabase, and have Marked.js compile it on the server? I could then inject the markdown into a form on an edit screen, and use Marked.js on the front end to make my own little blog post editor. Just like that, MDsveX was out and Marked.js had been promoted to Full Stack Markdown Compiler.
 |
|---|
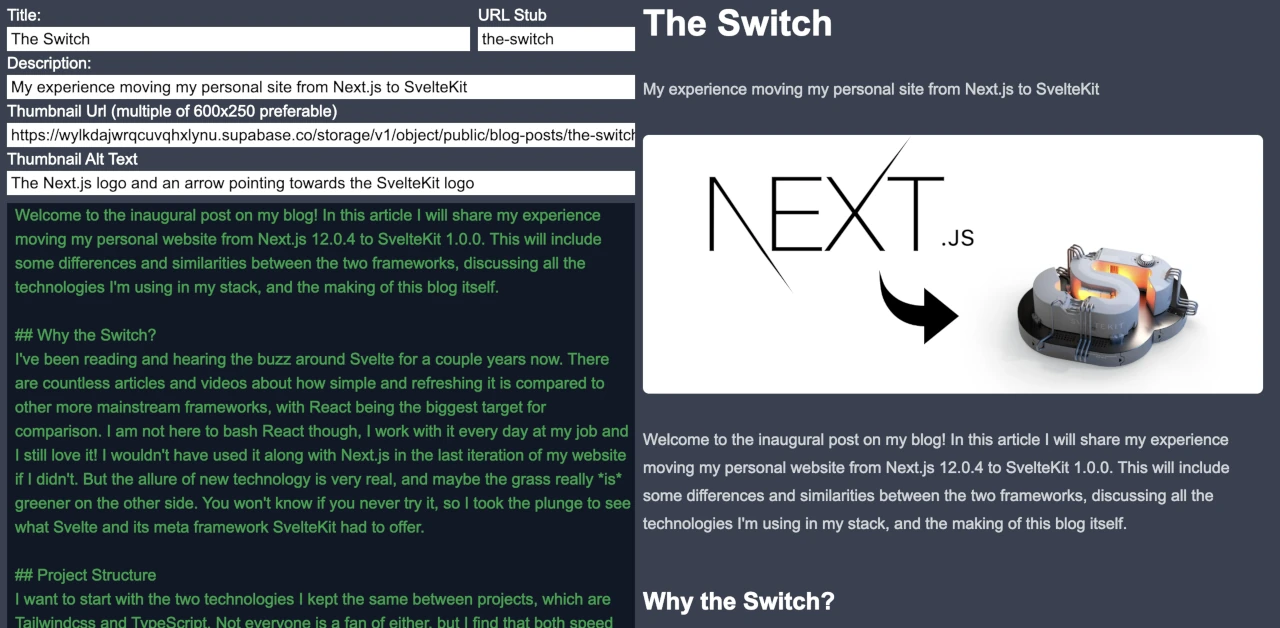
| My version of the side by side markdown editor |
I built out a new edit route for creating and editing blog articles, which included a form to submit a blog post's title, description, url slug, thumbnail url, thumbnail alt text and the blog post itself. Leveraging what a database table has to offer, I could include the extra form fields as extra columns. I also added a few other metadata columns, as well as a flag to publish or unpublish an article quickly. Using Supabase's built in authentication tools I set up an admin account, as well as adding row level security policies to my database tables, requiring an authenticated log in to do any non reading CRUD work on blog posts. Being logged in to this account would also be a requirement to access the edit page, as well as the only way to view unpublished articles for editing. Here's the route structure for both blog and edit.
/blog
    /[slug]
        +error.svelte <-- 404 if article's slug is flagged as unpublished (unless logged in), or there's no database entry that matches.
        +page.server.ts <-- read slug and pull content from Supabase
        +page.svelte <-- render content provided by +page.server.ts
    +page.server.ts <-- load previews of all published posts (and unpublished if logged in)
    +page.svelte <-- display list of published articles (and unpublished if logged in)
/edit <-- only accessible if logged in, 404s otherwise
    /[slug]
        +error.svelte <-- 404 if no blog post match from Supabase
        +page.server.ts <-- load current post contents and meta data
        +page.svelte <--- Display edit form populated with data from +page.server.ts
I wired up the form actions to Supabase, and it was done. I could now create, edit, and manage the publish state of my blog posts right here in this website without needing my development set up. Essentially, I had built my own small scale CMS and I couldn't be happier with how it turned out. While this wasn't everything I did during this project, I think I've covered the important details. Again, you can view the source code for this entire project here if you're interested.
If you've made it this far, thank you for reading to the end. I hope to use this blog as a public journal of development experiences, as well as for some information pieces around topics I'm passionate about, so stay tuned for more!